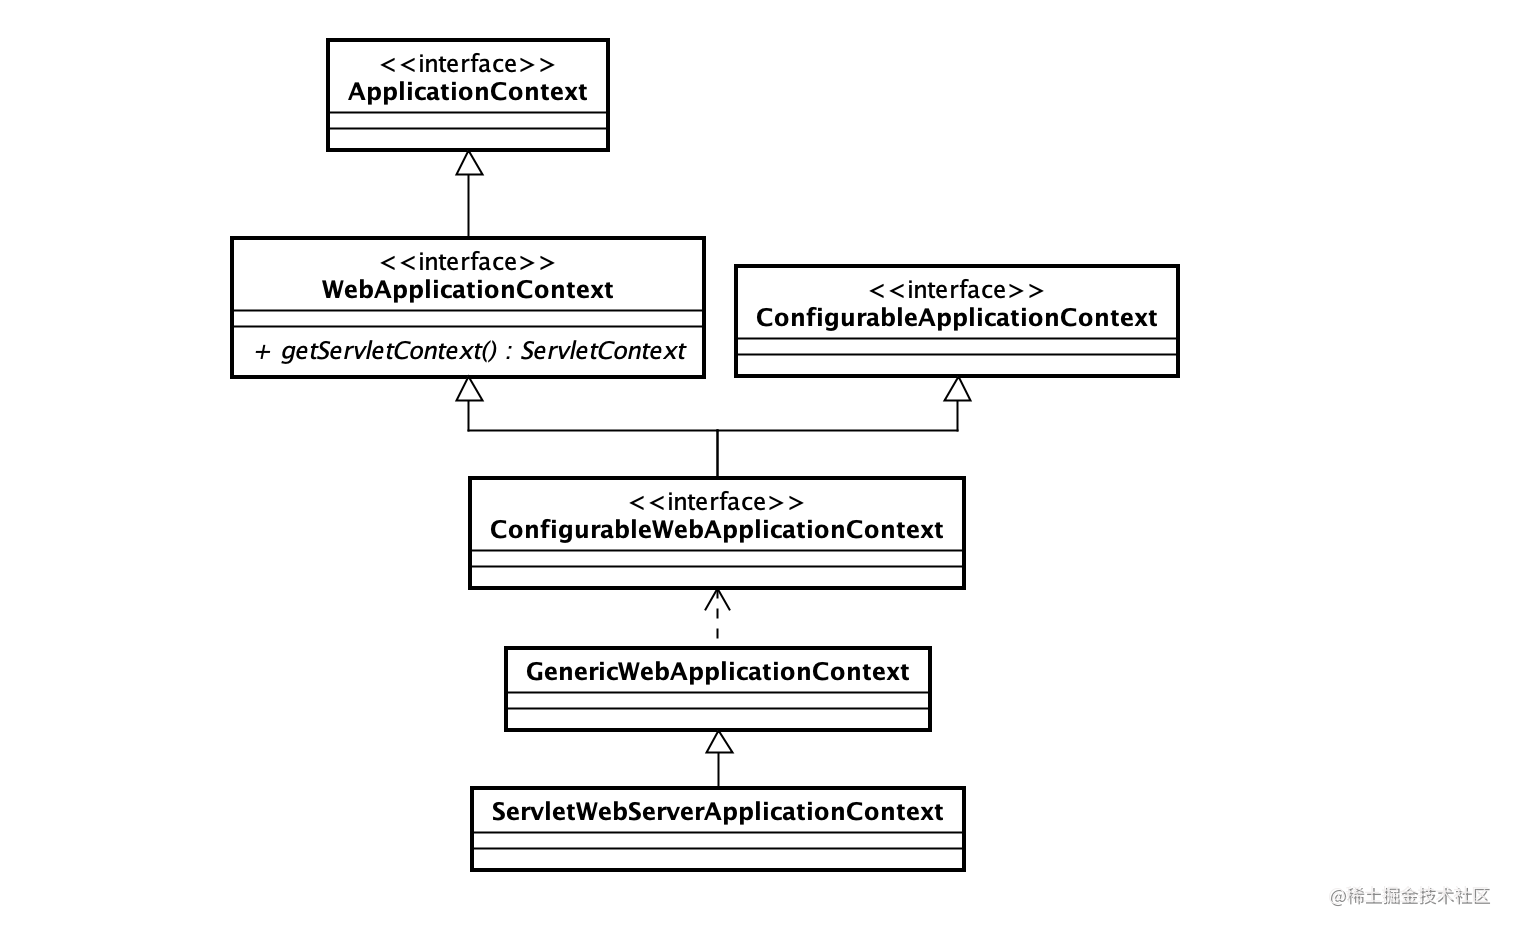
由于SpringBoot默认的web框架就是SpringMVC,如果我们需要完成与SpringBoot的集成,就需要在IOC容器的基础上定制开发Web容器, 其次,SpringBoot使用的是嵌入式Web服务器,所以我们还需要开发驱动嵌入式Web服务器的容器;本篇主要就来完成这两个功能
开发步骤讲解
WebApplicationContext
public interface WebApplicationContext extends ApplicationContext {
    String ROOT_WEB_APPLICATION_CONTEXT_ATTRIBUTE = WebApplicationContext.class.getName() + ".ROOT";

    ServletContext getServletContext();
}WebApplicationContext是在IOC容器ApplicationContext的基础上来扩展,提供了获取ServletContext的方法;
ConfigurableWebApplicationContext
为了让WebApplicationContext具有可配置化的能力,所以定义了ConfigurableWebApplicationContext
public interface ConfigurableWebApplicationContext extends WebApplicationContext, ConfigurableApplicationContext {
    void setServletContext(ServletContext servletContext);
}由于继承了ConfigurableApplicationContext,所以具备了配置基础容器的的功能,所以ConfigurableWebApplicationContext 只需要提供一个配置ServletContext的方法
Web容器的实现类GenericWebApplicationContext
public class GenericWebApplicationContext extends GenericApplicationContext
        implements ConfigurableWebApplicationContext {

    private ServletContext servletContext;

    public GenericWebApplicationContext(ServletContext servletContext) {
        this.servletContext = servletContext;
    }

    public GenericWebApplicationContext() {
    }

    @Override
    public void setServletContext(ServletContext servletContext) {
        this.servletContext = servletContext;
    }

    @Override
    public ServletContext getServletContext() {
        return this.servletContext;
    }
}GenericApplicationContext已经提供了基础容器所有功能的实现,所以我们继承它,只需要实现ServletContext可配置
ServletWebServerApplicationContext
因为我希望在SpringBoot启动的时候就启动一个嵌入式web服务器,所以我们还需要在ConfigurableWebApplicationContext提供创建Web服务器并启动的功能
public class ServletWebServerApplicationContext extends GenericWebApplicationContext implements WebServerApplicationContext {
    //定义WebServer,这是SpringBoot中的类,有多个实现:Tomcat,jetty等等
    private WebServer webServer;

    public ServletWebServerApplicationContext() {
    }

    @Override
    public WebServer getWebServer() {
        return this.webServer;
    }

    //try-catch整个容器的refresh过程,一旦出现任何异常,都需要关闭掉WebServer
    @Override
    public final void refresh() throws BeansException, IllegalStateException {
        try {
            super.refresh();
        } catch (RuntimeException ex) {
            WebServer webServer = this.webServer;
            if (webServer != null) {
                webServer.stop();
            }
            throw ex;
        }
    }

    //onRefresh是IOC容器提供的方法,允许用户在容器启动过程中做一些事情,这里我们就来创建Web服务器以及启动Web服务器
    @Override
    protected void onRefresh() {
        super.onRefresh();
        try {
            this.webServer = createWebServer();
            this.webServer.start();
        } catch (Throwable ex) {
            throw new ApplicationContextException("Unable to start web server", ex);
        }
    }

    //调用ServletWebServerFactory创建Web服务器
    private WebServer createWebServer() {
        ServletWebServerFactory factory = getBeanFactory().getBean(ServletWebServerFactory.class);
        return factory.getWebServer(this::selfInitialize);
    }

    //ServletContextInitializer 在Web容器启动完成后会回调此方法,比如:向ServletConext中添加DispatchServlet
    private void selfInitialize(ServletContext servletContext) throws ServletException {
        prepareWebApplicationContext(servletContext);
        Map<String, ServletContextInitializer> beanMaps = getBeanFactory().getBeansOfType(ServletContextInitializer.class);
        for (ServletContextInitializer bean : beanMaps.values()) {
            bean.onStartup(servletContext);
        }
    }

    //在servletContext中保存ApplicationContext,容器中保存servletContext的引用
    private void prepareWebApplicationContext(ServletContext servletContext) {
        servletContext.setAttribute(WebApplicationContext.ROOT_WEB_APPLICATION_CONTEXT_ATTRIBUTE, this);
        setServletContext(servletContext);
    }

}
向ServletContext中注册DispatcherServlet
SpringBoot已经提供了很方便的方式来注册Servlet,只需要继承ServletRegistrationBean,查看源码我们会发现这个类的父类是 ServletContextInitializer,在上面我们已经提到了在WebServer创建完成之后会调用ServletContextInitializer的onStartup 方法。
public class SmartMvcDispatcherServletRegistrationBean extends ServletRegistrationBean<DispatcherServlet>
        implements DispatcherServletPath {

    private final String path; //指定Servlet拦截的路径

    public SmartMvcDispatcherServletRegistrationBean(DispatcherServlet servlet, String path) {
        super(servlet);
        Assert.notNull(path, "Path must not be null");
        this.path = path;
        super.addUrlMappings(getServletUrlMapping());
    }

    @Override
    public String getPath() {
        return this.path;
    }

}